
The Laser Transmitter module is a copper head 650nm Laser Transmitter Diode that can emit a dot-shaped, visible red laser beam to used as a laser pointer, theft detection system, etc.
It accepts input signals that can be easily interfaced and supplied by microcontrollers such as Arduino, Raspberry Pi, ESP32, etc.
DHT11 Sensor module Specifications
The quick specifications of this sensor module is given below:
- Type: Transmitter
- Module: 650nm Laser
- Operating Voltage: DC 5V
- Operating Current: < 40mA
- Output Power: 5mW
- Output Wavelength: 650nm
- Operating Temprature: -10°C ~ 40°C [14°F to 104°F]
- Board Dimantions (L x W): 18.5mm x 14mm
- Weight: 4gm
Laser Transmitter module Pinout

|
The module has 3 male header pins those are -
|
Laser Transmitter Module Circuit Diagram
Schematic of the laser transmitter module circuit is shown below.

Components are used in the circuit - S1: 650nm Laser, R1: 10kΩ Resistor, and R2: 91Ω Resistor.
The working principle of the Laser Transmitter module circuit is simple. The main component of the module is a laser diode (S1) which consists of a metal protective housing with a lens for focusing and dot-shaping the laser beam. When a microcontroller provides an input signal to flow current through the laser diode (S1), it generates coherent light with a wavelength of 650nm with the help of current controlling resistors (R1 and R2).
How to Interface Laser Transmitter module with Arduino
Connection diagram of the DHT11 Sensor module with an Arduino is shown below.
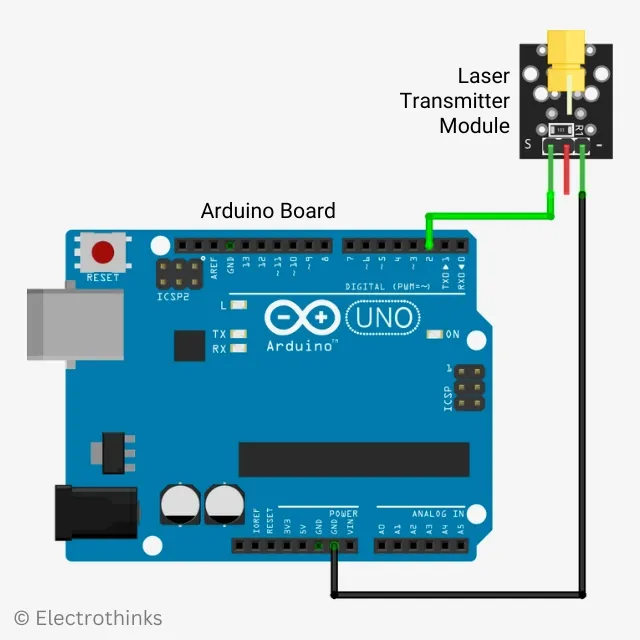
You will need to connect the signal pin (S) on the module to pin-2 on the Arduino and the ground pin (-) to GND. The interface does not require the power (middle) pin, so connection is optional for the user.
| DHT11 Sensor Module | Arduino |
|---|---|
| S | Pin 2 |
| middle | +5V (Optional) |
| – | GND |
The module transmits laser beam. The Arduino board control the laser beam by sendig a output signal to the module.
Here's a simple example of how you can automatically turns the laser on and off every 1-second interval (i.e. laser blinker) using an Arduino:
// Start Arduino sketch
int laserPin = 2; // Define the Laser Transmitter module interface with Arduino
void setup() {
	pinMode(laserPin, OUTPUT);  // Set Arduino pin as output
}
// Start the main program loop
void loop() {
	digitalWrite(laserPin, HIGH); // Turn on the laser diode
	delay(1000); // Delay one second
	digitalWrite(laserPin, LOW); // Turn off the laser diode
	delay(1000); // Delay one second
}
// End


No comments
If you have any doubts or questions, please let me know. Don't add links as it goes to spam. Share your valuable feedback. Thanks