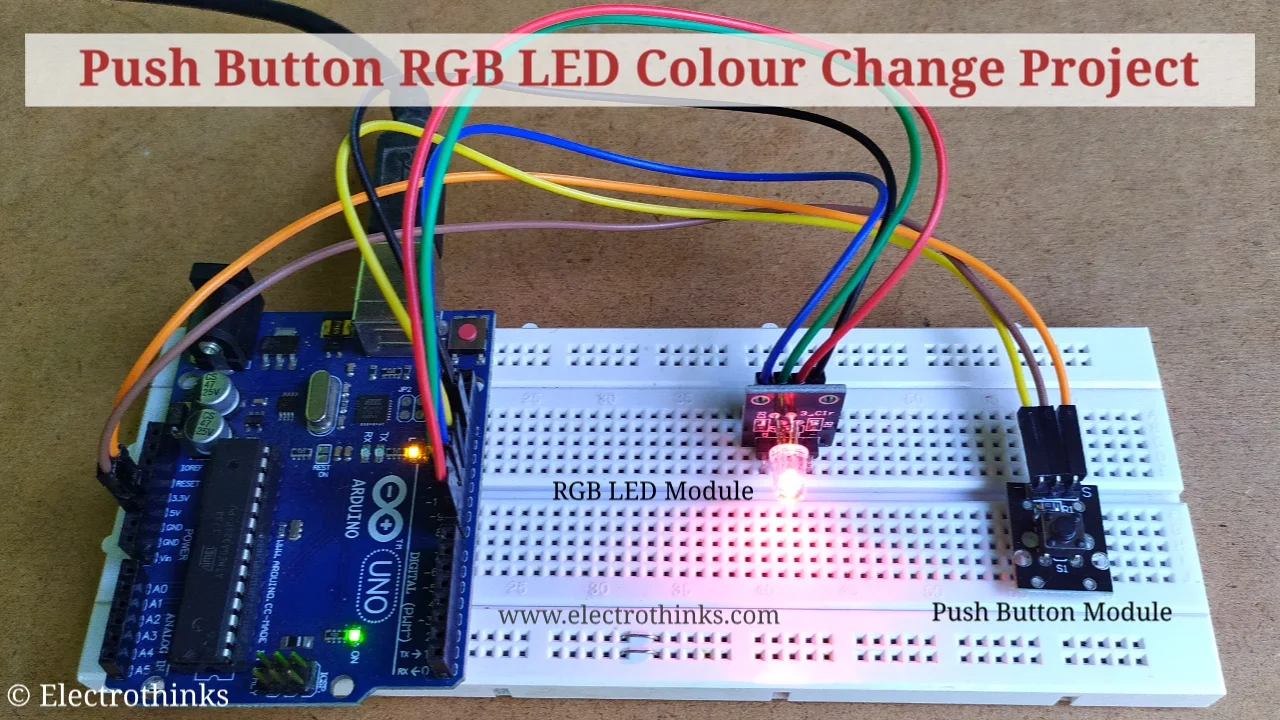
In this Arduino project, we will control an RGB LED using Push Button to change color interfacing with Arduino Board. Basically, The RGB LED will cycle through the colors red, green, blue, purple and white when we press the "Push Button". Let's make it.
Components List
The following components are needed for this project.
- RGB LED Module (or 1x RGB LED, 3x 150R Resistor).
- Arduino Board.
- Push Button Module (or 1x Push Button, 1x 1K Resistor).
- Breadboard.
- Jumper Wires.
I used KY-016 RGB LED Module and Push Button Module in this project. Don't worry, you can easily create these modules in your home.
Circuit Schematic
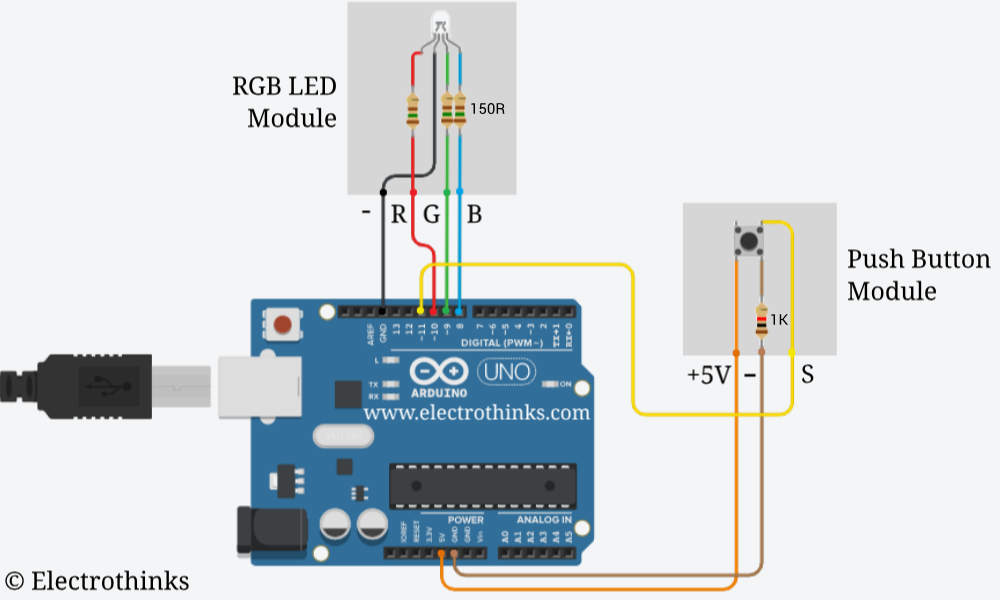
Now let us interface RGB LED and Push Button with Arduino. So the circuit diagram and connection are given below. You can follow the same.
Source Code/Program
The source code/program for interfacing RGB LED and Push Button with Arduino is given below. Copy this code and upload it to Arduino Board.
#define button 11
#define redLED 8
#define greenLED 9
#define blueLED 10
int state = 0;
int old = 0;
int buttonPoll = 0;

void setup() {
 pinMode(button,INPUT);
 //RGB LED set as output
 pinMode(redLED,OUTPUT);
 pinMode(greenLED,OUTPUT);
 pinMode(blueLED,OUTPUT);

 digitalWrite(redLED,LOW);
 digitalWrite(greenLED,LOW);
 digitalWrite(blueLED,LOW);
}

void loop() {
 buttonPoll = digitalRead(button);
 if(buttonPoll == 1) {
 delay(50);
 buttonPoll = digitalRead(button);
 if(buttonPoll == 0) {
 state = old + 1;
 }
 }
 else {
 delay(100);
}

switch (state) {
 case 1: //Red color
 digitalWrite(redLED,HIGH);
 digitalWrite(greenLED,LOW);
 digitalWrite(blueLED,LOW);
 old = state;
 break;
 case 2: //Green color
 digitalWrite(redLED,LOW);
 digitalWrite(greenLED,HIGH);
 digitalWrite(blueLED,LOW);
 old = state;
 break;
 case 3: //Blue color
 digitalWrite(redLED,LOW);
 digitalWrite(greenLED,LOW);
 digitalWrite(blueLED,HIGH);
 old = state;
 break;
 case 4: //Purple color
 digitalWrite(redLED,HIGH);
 digitalWrite(greenLED,LOW);
 digitalWrite(blueLED,HIGH);
 old = state;
 break;
 case 5: //White color
 digitalWrite(redLED,HIGH);
 digitalWrite(greenLED,HIGH);
 digitalWrite(blueLED,HIGH);
 old = state;
 break;
 default:
 digitalWrite(redLED,LOW);
 digitalWrite(greenLED,LOW);
 digitalWrite(blueLED,LOW);
 old = 0;
 break;
 }
}


bad projec t i t dint werk wen i ded i t
ReplyDeletePlease, check the connections and try again.
DeleteHow to change the code to make the LEDs flash?
ReplyDeleteI have made your circuit that works perfectly, but would like to add one more button press to select a fade red to green to blue, but don't know how to add it in to the menu, please can you help date 10-06-22 bob
ReplyDeletewhat is the old variable for?
ReplyDelete