
The DHT11 Sensor module is a humidity and temperature sensor integrated into a single chip, which is used for measuring ambient temperature and humidity. It provides digital output signals that can be easily interfaced and read by microcontrollers such as Arduino, Raspberry Pi, ESP32, etc. The data is transmitted using a single-wire digital protocol.
The module has relatively low accuracy compared to more advanced sensors like the DHT22 or the SHT series. Additionally, it has a slow response time and can be sensitive to external factors such as airflow and condensation. However, it can still be a good choice for simple temperature and humidity sensing applications.
DHT11 Sensor module Specifications
The quick specifications of this sensor module is given below:
- Type: Digital
- Module: Temperature and Humidity Sensor
- Operating Voltage: DC 3.3V ~ 5V
- Humidity Measurement Range: 20% to 90% RH
- Humidity Measurement Accuracy: ±5% RH
- Humidity Measurement Resolution: 1% RH
- Temperature Measurement Range: 0°C to 50°C [32°F to 122°F]
- Temperature Measurement Accuracy: ±2°C
- Temperature Measurement Resolution: 1°C
- Signal transmission range: 20m
- Board Dimantions (L x W x H): 15.5mm x 12mm x 5.5mm
- Weight: 8gm
DHT11 Sensor module Pinout

|
The module has 3 male header pins those are -
|
DHT11 Sensor Module Circuit Diagram
Schematic of the dht11 (temperature and humidity) sensor module circuit is shown below.
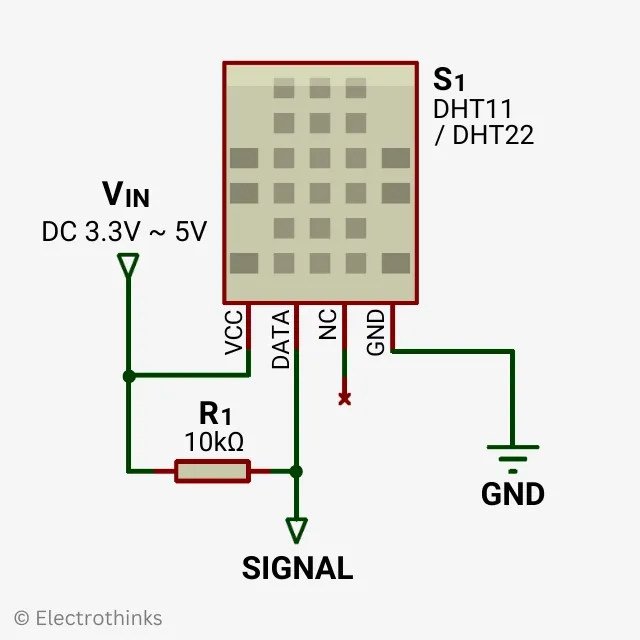
Components are used in the circuit - S1: DHT11 Sensor, and R1: 10kΩ Resistor.
The working principle of the DHT11 sensor module circuit is simple. The main component is the DHT11 sensor (S1), which utilizes a digital communication protocol to transmit data to the microcontroller. When the microcontroller requests data, the sensor responds by sending a sequence of bits, where each bit is represented by a specific duration of a high and low signal on the DATA pin.
A pull-up resistor (R1) is connected between the VCC and DATA pins of the sensor to ensure stable data communication. This resistor helps maintain a known state on the DATA line when the sensor is idle.
How to Interface DHT11 Sensor module with Arduino
Connection diagram of the DHT11 Sensor module with an Arduino is shown below.
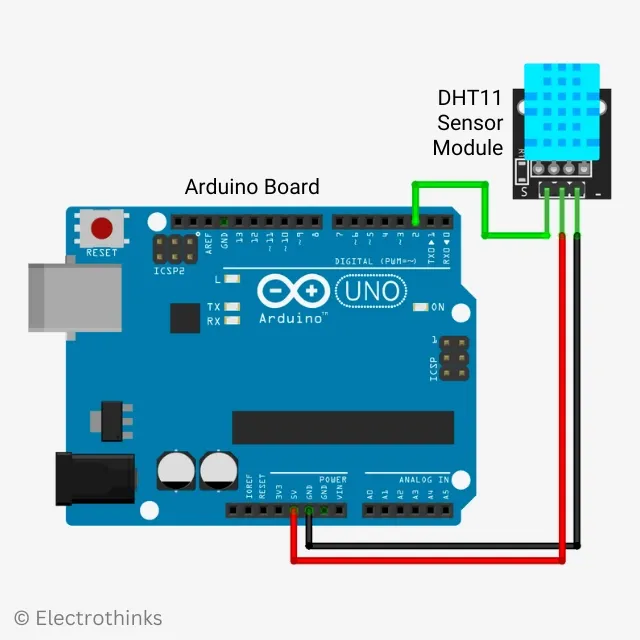
You will need to connect the power pin (middle) and ground pin (-) of the dht11 sensor module to +5V (or +3V3) and GND on the Arduino, respectively. The module signal pin (S) connect to digital pin 2 on the Arduino.
| DHT11 Sensor Module | Arduino |
|---|---|
| S | Pin 2 |
| middle | +5V |
| – | GND |
The Arduino acts as the brain of the circuit. It communicates with the DHT11 sensor module to read temperature and humidity values. The Arduino supplies power to the module and reads the data sent by the sensor through the DATA pin.
The module transmits data in a 40-bit sequence. The Arduino board receives this data and interprets it to calculate the temperature and humidity readings.
Here's a simple example of how you can read temperature and humidity values from a DHT11 sensor using an Arduino:
#include <DHT.h> // Include the DHT library

#define DHTPIN 2 // Pin connected to the DHT11 Sensor module
#define DHTTYPE DHT11 // Define the type of Sensor being used DHT11

DHT dht(DHTPIN, DHTTYPE); // Create a DHT object

void setup() {
  Serial.begin(9600); // Initialize the serial communication at a baud rate of 9600
  dht.begin(); // Initialize the DHT sensor
}

void loop() {
  delay(2000); // Delay for 2 seconds

  float temperature = dht.readTemperature(); // Read temperature value in Celsius
  float humidity = dht.readHumidity(); // Read humidity value

  if (isnan(temperature) || isnan(humidity)) {
    Serial.println("Failed to read from DHT11 Sensor!"); // Print an error message if the readings are not valid
    return;
  }

  Serial.print("Temperature: ");
  Serial.print(temperature); // Print the temperature value
  Serial.print(" °C\t"); // Print a tab character
  Serial.print("Humidity: ");
  Serial.print(humidity); // Print the humidity value
  Serial.println(" %"); // Print a new line
}
Please note that the above code assumes you have already installed the "DHT sensor library" in your Arduino IDE before uploading the sketch, which allows you to easily interact with the DHT11 sensor.
To install the library, go to "Sketch" > "Include Library" > "Manage Libraries" and search for "DHT", then click "Install" next to the "DHT sensor library by Adafruit".
After uploading the sketch to your Arduino board, open the serial monitor at a baud rate of 9600. You should see the temperature and humidity readings displayed in the serial monitor every 2 seconds.


0 Comments