In this project, I will demonstrate how to make a simple solar charger with a 1S battery management system for lithium (LiIon & LiPol) cells. It effectively converts the FREE solar energy into electricity and then is stored within a cell. This charger is designed to be integrated into the emergency light circuit.
Let's make it!
Components for 1S Lithium Cell Solar Charger
The following components are required to make this charger:
| Name | Value | Qty. |
|---|---|---|
| Solar Panel | 5V, 200mA | 1 |
| 1S BMS | TL431 BMS Module | 1 |
| Diode | 1N4007 | 1 |
| Lithium Cell | Li-Ion or Li-Pol | 1 |
| Connecting Wire | - | - |
| Soldering Iron Tool Kit | - | 1 |
Solar Powered 1S Lithium Cell Charger Connection Diagram
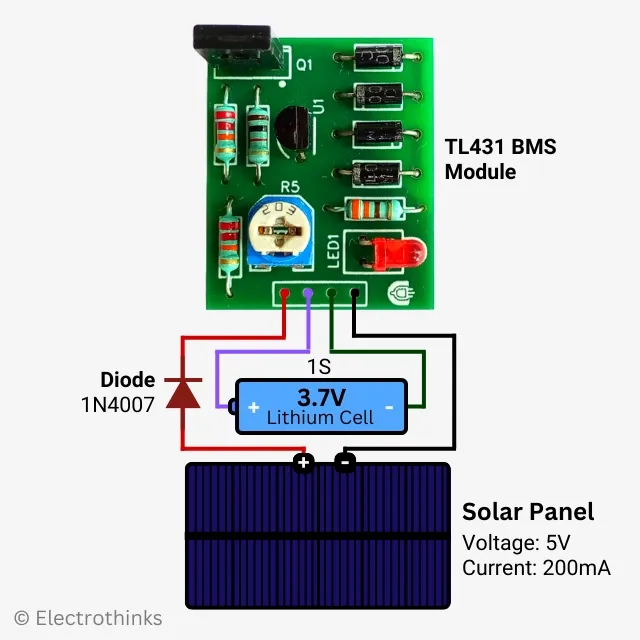
The connection diagram of a Solar charger for a single lithium cell with an overcharging protection circuit is shown below.
The working principle of this solar charger is simple. The solar panel converts solar photon energy into a 5V output at 200mA. Subsequently, a diode is employed to reduce the output voltage by approximately 0.7V. This adjusted output voltage is monitored by a Battery Management System (BMS) module, which serves to safeguard the Lithium cell from overcharging.
Testing & Demo: Solar Powered 1S Lithium Cell Charger
Before commencing the charging process for a Lithium cell, it is necessary to calibrate the output voltage of the BMS module using the variable resistor located on it. To achieve this, I place the solar charger circuit under sunlight conditions and set the output voltage to 4.2 Volts.
Then, I connect a Li-ion cell to the charger (make sure the lithium cell is placed in a cool place). When the LED on the BMS module begins to glow, it indicates that the cell has reached full charge.


No comments
If you have any doubts or questions, please let me know. Don't add links as it goes to spam. Share your valuable feedback. Thanks